
This is Part 4 (the final part) of my underwater ROV (Remotely Operated Vehicle) project. If you haven’t already, check out Parts 1, 2, and 3.
Welcome to the fourth and final part of my ROV project! I first started working on this in the Summer of 2019 — over 5 years ago! It’s been a while, and now I am making the call to end the project.
At the end of Part 3
- I had working software onboard the sub and on the laptop base station.
- I was able to use a joystick to control the thrusters.
- I was able to change the thruster ratios and dial them down as the thrusters each produced 5kg of thrust and my sub weighed about 2kg.
- All electronics were complete with the exception of the camera (more on that to come).
- I was working on getting the dry hull water sealed and rated to 30 feet deep.
What Happened and Final Lessons Learned
- Camera
- I could get it working but the lag made it near useless for real-time controlling underwater.
- When I worked on other robotics teams, they used an additional CPU just to handle the video stuff. This might have been a better way to go — get a dedicated processor for video feeds. We also used fibre optics instead of Ethernet. I thought Ethernet would be fast enough for real-time ‘grainy’ video transmission, but maybe I was wrong.
- In the future, if I was to do this again, I would get a dedicated raspberry pi ‘hat’ to live stream the video, and consider a fibre optic tether instead of Ethernet — though that would add complexity on both sides as I would need the hardware to convert the optical signals back to instructions my base station and sub could understand (perhaps another ‘hat’).
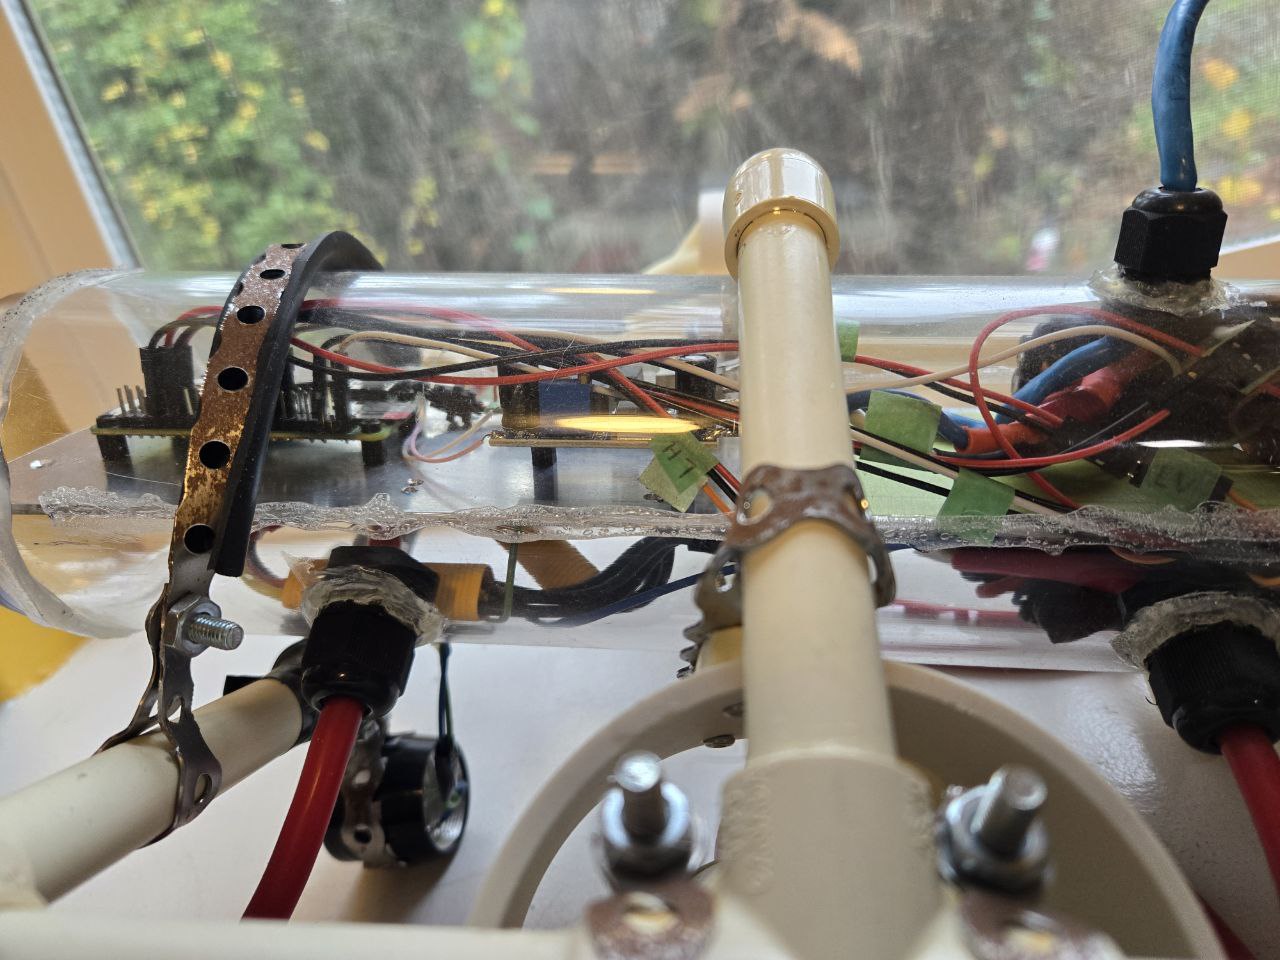
- The Dry Chassis
- Size.
- This chassis never would have fit all of the components I needed to run the sub. It simply was too small. This was a fundamental flaw in the mechanical design of the sub.
- In THEORY, everything should fit, but when you account for the wires and space required to put the electronics stack into the chassis (not just the final state), then there is a lot less space to work with than I originally thought.
- In the end, I was able to get everything into the sub — minus the camera (the mounts kept breaking when I tried to put the electronics stack in) and the battery (a rather important part of the whole affair — the motor controllers and their thicker wires took up the entire lower battery space).
- Even though I got everything else into the sub, the strain of some of the wires pulled them out of position. This could have been solved by designing a simple PCB (Printed circuit board) and getting it printed. I even debated this but the numbers were too large for prototyping. In my neck of the woods, a ‘sample run of PCBs is 100, so I would end up with 100 PCBs for my 1 submarine — good if one breaks, but maybe worth it in the future if there weren’t other fundamental issues with sub.
- In the future, if I was to do this again, I could consider:
- Making the chassis larger and giving it more space — even if I think the components will fit.
- Going the PCB route and printing circuits to reduce the number of wires in the chassis. This would lower the risk of a wire getting pulled out when putting the electronics stack in place, and also standardize the space in the hull. This is important as the CPU will still generate heat in this enclosed space, and I would need to handle that in some way — a heat sink on a metal end cap would do the trick, but then the CPU would need to be at the rear of the sub — another fundamental redesign.
- Looking into smaller motor controllers that can handle the same load. The motor controllers were the largest non-fixed component in the electronics stack. They and their wires took up so much space that I could not fit the battery into the final design.
- Water Seal.
- The dry hull never got sealed from water. It kept leaking through all me efforts.
- One contributor to this was my decision to have a round hull and bulkheads that were designed for a flat surface. This was an aesthetic decision. I wanted it to look cool. However, the round sides made it impossible for the rubber seals to fully contact the sides of the hull and create a solid, water-tight seal. They needed a flat surface to even have a chance. I attempted to compensate with copious amounts of additional sealants (I tried a variety of flexible, waterproof cements, epoxies, and caulking), but none proved up to the task. The hull simply would not keep dry.
- Another contributor is the end cap. I selected an ABS pipe with a rounded o-ring and used grease on the o-ring to make a good seal. This worked if it was screwed in very tightly, but that caused stress on the epoxy used to connect the ABS to the clear acrylic tube used for the main chassis. I suspect that the continued sealing-then-unsealing of that cap caused micro cracks where water, under pressure, would seep into the main hull. Even after multiple attempts to seal it — again, tried a variety of methods that might be more flexible and resistant — the water still found a way in.
- In the future, if I was to do this again, I would take one of 2 approaches:
- Pay to get an injection-moulded chassis that is all one piece. This would reduce the number of potential areas where sealant is a factor to one: the main cap — which would also be specifically designed for the task, flat (for connectors), and using a proper gasket. OR…
- Go for function first and ignore aesthetics by building a box-like structure. This would also help with visibility as the camera had difficulty seeing out of the front ‘dome’ cap. Things kept getting distorted.
- Size.
Everything else worked as it should. When not packed into the small chassis, I was able to run the software and control the thrusters. I was able to get video — albeit delayed — and I was able to remotely enable lighting. Unfortunately the challenges listed above proved to be too much to complete the project. Perhaps in the future I will rip out the electronics stack and put it in a larger, better-designed chassis. If I do that, I will update this post.
All in all, I regret nothing. This was a fun project. I started with nothing and built everything myself. Hopefully the lessons learned will help others who follow the same path. Good luck!
Some pictures of the final product: Nautilus Mk1


You must be logged in to post a comment.