
On May 1, 2020 I started Offensive Security’s Penetration Testing with Kali (PWK) course and the path to gain my OSCP certification. Long had it lingered in my mind, and long had I toyed with the idea of starting the journey — only to think myself unprepared and slink back to practicing against vulnerable VMs — until Covid-19 hit, and we were forced to shutter ourselves away. Social gatherings were banned. “Bubbles” became a household term that took on a whole new meaning. And I was suddenly presented with the conditions necessary to entirely devote myself to the effort. In all that has happened this year, I am fortunate.
“Penetration Testing with Kali” is the course element of the OSCP certification. The OSCP (Offensive Security Certified Professional) is a highly-regarded ethical hacking certification. It includes a 24-hour proctored exam where the student is required to attack a series of machines and gain privileged access to them. It is a practical exam, and, in an industry known for much talk, a practical exam cuts through the BS.
In keeping with tradition the following article outlines my experience after successfully gaining my OSCP certification, and it provides a few tips for those wishing to do the same.
My Situation and Strategy
I feel that my experience is worth sharing as there are plenty of articles on the internet written by those who were able to forego work and dedicate a few full-time months to their OSCP efforts. I am not in this category. I worked full-time throughout my studies. We also have a toddler, and rare is the moment when silence prevails — and when it does one should be wary. It is my hope that this article will give hope to those who are in a similar situation.
I studied on evenings and weekends. In general, studying started at 5pm-11pm or so on weekdays, and most Saturdays and Sundays. When I felt stressed or overwhelmed I took days off, but I kept to that rough schedule.
I read that it can take some time to go through all of the course content and lab machines, and so I bought the maximum of 90 days of lab time when I registered for the course. I would end up buying another 60 days (discussed later in this article). My plan was to go through the textbook first, do the exercises, then hit the labs.
NOTE: The Covid lock-down seemed like the perfect time to take this course on and in some ways I was wrong. Yes, I had fewer distractions from friends and family, but I also had a significant increase in lock-down-related stress at home and at work. Things ramped up and the stress ramped up with them. I suppose there is never a “perfect” time to take this course. You just have to do it. Don’t procrastinate.
Studying, Content, and Labs
I started with the textbook. The daunting 800-page PDF was tedious and frustrating at times, but I spent the time to go through the entire thing — even though I came from a very technical security background — and learned a plethora of new techniques and tools. The exercises took a significant effort but I wanted to get those extra 5 bonus points — just in case I needed them. The textbook and exercises took me 60 days to complete.
After 60 days, and with only 30 of my 90 days of lab time left, I felt under the gun. I had read plenty of articles about how people were finishing in 30 or 60 days — and here I was, at 60 with only the textbook done. It was discouraging.
I hit the labs with a vengeance and was able to root a decent number of machines in the lab before my 90 days ran out. I knew I wasn’t ready and bought another 60 days. The new 60-day timeline gave me plenty of time to work through various boxes and I aimed to root a box a day (Didn’t always make that goal. Sometimes it was a box every 3 days, sometimes it was 2 boxes in a day).
I came to the realization that I lacked a number of techniques that would take too long to learn by myself and so I took Tib3rius’ Linux and Windows privilege escalation courses on Udemy. This helped point me in the right direction mentally in addition to providing a long list of techniques to add to my playbook. For me this course helped immensely — not because it taught me everything I needed to know (it didn’t), but because it helped guide my approach to privilege escalation.
In all, I rooted 34 machines before taking my exam the last day of my lab time. I saved the week before the exam for lab report writing (was about 300 pages) and clarifying my playbook.
Exam 1, Failure, and Picking Myself Up
I did my research on the exam and knew I needed to pace myself, take breaks, sleep, and have a plan. I started at 1pm (as I didn’t want to mess with my usual sleep schedule), and planned on taking 5 or so hours to sleep at 11:30pm or so. I also brought a few healthy snacks and plenty of coffee — though I kept the french press out of the room as an excuse to get up and out of the chair (it will kill your back and neck by the end).
I didn’t know what to expect with the proctoring software (and if there would be any last-minute glitches), having someone watch you the whole time, and general vibe of the exam, but once I got into the rhythm pretty quickly and focused on the exam. In an unfortunate turn of events I caught a cold the day before the exam and was dealing with its symptoms during the event — Buckley’s was my friend.
In the end, I had the buffer overflow and 3 user shells — but no privilege escalations. I, surprisingly, had a ton of fun, but, less-surprisingly, I failed.
This was tough — but not completely unexpected. I just spent 5 months working towards this and I failed, but I also knew the exam was hard and that it is common to take the exam multiple times. I took a week off to clear my head then grabbed a long list of OSCP-like VulnHub VMs and started at the top. I made it a goal to hit 15 boxes before I register for the exam again. It was clear that my privilege escalation needed improvement and so focused on learning every privesc method I could. I re-read my notes from Tib3rius’ courses. I watched vulnerable VM walkthroughs and added any new techniques to my playbook. I would root a vulnerable VM then go back and try to find other paths for privilege escalation. Sometimes the boxes only had a single way to escalate privileges and this would seem like a waste of time, but I learned what files should be in certain directories, and learned plenty of commands along the way — would recommend.
Within a few weeks I had hit my goal of 15 boxes and registered for my second attempt of the exam. By the time the date came I had rooted an additional 24 boxes for a total of 58 machines rooted (34 lab and 24 Vulnhub). Those additional 24 boxes taught me a significant amount and I would HIGHLY recommend considering looking for a similar list if your lab time has run out. It’s free.
Exam 2 and the Pass
My strategy for the exam did not change in my second attempt: Hit the Buffer Overflow, and root the high point machines. Bring food and chill. Drink coffee but pace yourself. When stuck, take a step back and ask what you’re missing. If 2-3 hours stuck, try another box. Rely on your playbook. Exam starts at 1pm. Keep the sleep schedule the same.
I got the buffer overflow in about an hour and twenty minutes, and when I went to bed at 12:30am, I had 70 points. I woke up and spent the rest of my time trying to hit the other machines and ensuring that I had proper documentation and screenshots. I submitted the report that evening and learned of the results a day or two later.
Helpful Tips when Starting PWK/OSCP
Here are some helpful tips for those looking to start the PWK course and go for their OSCP:
- Know that this will take a lot of effort — good things rarely come easily. Put in the work and you will be rewarded.
- Don’t skip steps
- Try to avoid hitting the walkthroughs of VMs until you’ve given it a good effort — 2-4 hours (this prevents you thinking you are ready before you actually are: There aren’t hints in the exam)
- CAVEAT: I did the exercises in the book, but this isn’t required. I wanted the extra 5 points for the report. I learned a lot of techniques that didn’t help in the exam, but definitely help in practice.
- Write a detailed playbook/methodology and keep it up-to-date
- Update it EVERY time you hit a new box
- Keep a log of each command used for each box — even if you didn’t learn a new tool
- ctrl+f is your friend (“I KNOW I’ve used this command before…” — happened a lot)
- Set expectations with your spouse — This will require sacrifice. They will need to be onboard
- ESPECIALLY if you have children!
- Know that it is OK to take breaks. This is a marathon
- It is easy to get into a downward spiral of “I can’t do anything because I need to study” and then when you are pulled away, you think “I should be studying right now” — you just don’t enjoy anything because you are thinking about studying.
- Avoid that mindset. Know that playing video-games (or whatever) instead of studying is important for the long-game. Mental health is key. The right mindset makes all the difference.
- Be willing to fail an exam, pick yourself up, identify your weaknesses, work to fix them, and hit the exam again
- THIS is the ethos of “try harder” — not some dismissive term that is posted by a user in the forum who just doesn’t want to answer your question.
[EDIT] Once The Dust Settled…
This section was added after some further reflection and clarity of mind — After the dust had settled. I realized that some better guidance may be useful to those who are currently going through the OSCP process. Again, this is just one (my) approach to the OSCP — which worked for me. This will be mostly advice on how to approach and document your findings, and some resources to help get you started.
Approach
This approach worked for me:
- Go through textbook, do all exercises, take notes in CherryTree
- Take detailed notes for every exercise. Copy and paste the commands you use into your notes.
- This will help you CTRL+F things when you are in a bind.
- Hit the labs, get more lab time if necessary, but make sure you hit a decent amount of boxes (Some say at least 30)
- Hit the list of OSCP-like Vulnhub boxes
- This helped me nearly more than the lab boxes, though it could have been because I had already spent so much time in the labs.
- Consider hitting up Tib4rius’ Windows and Linux privesc courses on Udemy. They give a good overview of some great techniques. This is NOT required, but I found it helpful.
- As with everything, take DETAILED notes! Don’t just say “use shellshock”. Write down the commands required, download the code, compile it and save it somewhere, copy and paste the path to your notes section, copy the url from the github page that you grabbed the code from, test the code so that you can quick-use it.
- This way shellshock (in this example) becomes an easy test instead of an “effort” to try out. You’ll start referring to it more in general, and you won’t have to fight with compiler flags and such when you really need it. You’ll thank your previous self!
Some Resources, Write-Ups, Blogs, etc.
- [Shameless Self Plug] I wrote a quick methodology that might help:
- I found this blog helpful when starting out and planning things:
- This privesc article had a lot of the commands in my “post exploitation” section:
- NOTE: You will find what commands you use most — again, put the entire commands in your notes. Make it copy-pasteable and do not leave anything to memory. Add commands as you go. The moment you learn a new method, make a section for it and organize the notes.
- NOTE: You will find what commands you use most — again, put the entire commands in your notes. Make it copy-pasteable and do not leave anything to memory. Add commands as you go. The moment you learn a new method, make a section for it and organize the notes.
- Need a place to start for reverse shell commands? HighOnCoffee has got you covered:
- https://highon.coffee/blog/reverse-shell-cheat-sheet/
- Do not rely on the site — copy and paste the commands into your notes as you use them — with references
- HighOnCoffee also has a good Local File Inclusion (LFI) cheat-sheet. I used this as a basis for my LFI section then added things as I learned them:
- Need to figure out if a linux binary can be used to elevate privileges — or execute commands? Check out GTFOBins:
- https://gtfobins.github.io/
- NOTE: I use this heavily as it has commands for multiple scenarios: binary has SUID, user allowed to use sudo on it, etc.
- Found an unsalted hash? Try crackstation:
- https://crackstation.net/
- NOTE: Will run the hash against a massive list of pre-hashed values. Also hits MySQL 4.1+ passwords.
- Reddit has an OSCP subreddit:
- https://www.reddit.com/r/oscp/
- NOTE: Can be hit or miss, but you can find blogs, tutorials, and write-ups/walkthroughs for boxes
- Vulnhub hosts vulnerable VMs for you to practice on. If you run out of lab time and aren’t interested in spending more money, try:
- https://www.vulnhub.com/
- NOTE: Check out the list of vulnerable VMs in my ‘Quick Methodology‘ article
The Devil is in the Details: Documentation!
You will want to trim time where you can. Start with good templates.
- I used a pre-written template (that I wrote myself) for each box’s recon phase, and another one for when I got a shell.
- I had a “discoveries” template too — as I found that I was taking a long time switching back and forth on practice boxes looking for discovered credentials, or “places/things of interest”, etc.
- This standardizes your methodology and the structure of your attack on that VM. You will know where to look for your discovered usernames, passwords, or what you did once you got a shell, etc.
[BELOW] The ‘Log Template’ for the recon phase of a box. Initial Network Recon is where I copied and pasted nmap scan results. INR summary is where I went through the nmap scan and pulled out all the ports, services, versions, and any helful info — so that I didn’t have to refer back to the whole nmap scan again. “Actions Taken” was a copy-paste list of every command I used against the box. If a filled-in template was given to a stranger, they would be able to hit the box and get in like I did:

[BELOW] My template for once I get a shell on the target box — with some help in getting a decent interactive shell:

[BELOW] My ‘Discoveries’ template. You don’t always want to be scrolling back and forth to find those creds you found earlier. Copy and paste them to your discoveries page and you will know where they are. Saves a lot of time — ALSO note the users, and orphaned passwords areas. You don’t always get a nice user-pass cred:

Documenting your methodology
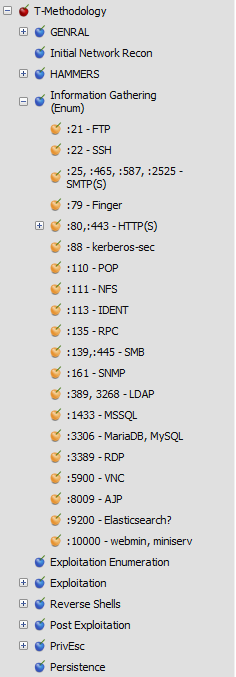
I broke my methodology down into a few categories. The below image shows the main sections of my methodology — and the expanded information gathering section.
- GENERAL
- Just general info, help on general commands, compiling code, mimikatz, burp, etc.
- Also had the templates for hitting a new box: recon, shell, and discoveries
- HAMMERS
- I call really powerful/prevalent exploits (like shellshock (in various forms), SambaCry, EternalBlue, zerologon, etc.) “hammers”. When all else fails, try to bring in a hammer — or try it first?
- This section details where I have compiled the code, links to explanations and github pages, and copy-paste commands to run the exploit against a target with a list of variations.
- Good in a pinch
- Information Gathering
- I spend the most time here. This is the “external enum” of a box. Information gathering.
- Each approach, command, and response will vary based on the port of the target, so this is organized by port
- Each “port section” contains detailed copy-paste commands, variations, hints, and tips for teasing out info.
- The moment I finished my INR Summary (from my log/recon template) I went here to hit things off.
- Exploitation
- This section lists the various classes of “exploits” to try — The term “exploit” here can be very generous.
- Similar in format to the Information Gathering section, but with exploit help
- Includes help and references for LFI/RFI, SQLi, directory traversal, etc.
- Reverse Shells
- Anytime I found a reverse shell, I put it here in copy-paste format and highlighted the parts that need to change
- The most used ones went into a special section at the top, but this was just a massive list of reverse shells organized by language (php, python, bash, etc.)
- Post Exploitation
- Once you get a user shell, it is usually not admin. You need to do some recon on the box. This is my go-to.
- I had 2 main sub pages (but many more): Linux and Windows
- Each page had a list, in order of what to try, of copy-paste commands to run on the target box
- This saves you lots of time keeping things repeatable, but also saves you when a box will not let you upload stuff — You can run this all manual and still be ok.
- Take a look at the g0tmi1k basic privesc link (in resources) for a good place to start
- This section also has a “the goods” section
- copy-paste instructions to get the proof.txt, hostname, run ipconfig, etc. for my proof screenshot
- For both Linux and Windows
- Highly recommended — it would suck to forget something and you can’t go back and screencap it. Remove the guesswork and just write the commands down and use copy-paste.
- This section also had a section for dealing with things like port forwarding, file transfer methods, etc.
- Things you’ll need once you get a shell on a box.
[BELOW] An example Information Gathering page:

Final Words
All in all, the OSCP was a massive challenge, and once I found myself on the other side of it I am glad I went through it. I learned so much more than I expected (Coming from a pentest background). It took its toll, but in the end the things worth getting are never easy to attain.
As for the tips and hints I have provided above, I hope that some of you find them useful. I am sure there are many ways to document things, but I could not find any reference to methodologies of how to document them when I took the PWK course — So I provide my way here. Take it, improve upon it, rip it apart.

You must be logged in to post a comment.